Netkit, IPsec and Wireguard
31 Jan 2021From an awesome project maintained by the original developers and a few fellows in the cyber society, Netkit-JH comes from the original Netkit and allows the virtualisation of computers and networks on a host machine. The original netkit has now become Kathara, using docker containers instead of user-mode linux instances.
![]()
This is great for testing and implementing ideas, where this post goes onto making some VPN tunnels using standard IPSec with StrongSwan and also Wireguard.
The setup
In current view of everyone working from home, getting a VPN tunnel to the company server makes sense. This tunnel in the sewer that is the internet has to be done left → right and then left ← right in StrongSwan IPSec. The setup for the lab made the internet as a box that simply routes packets accross.

Note: no tap has been put in here to the actual internet, but is easily possible in the netkit lab.conf folder of this lab. Whilst we are on the topic of configuration files, netkit will interpret each folder for the lab dorectory as a machine, so each machine in the diagram above has it’s own folder. Next, in lab.conf:
#Only startup the following machines:
machines="internet rW w rA a"

internet[0]=ispw
internet[1]=ispa
internet[2]=ispb
#Give some more memory to the big guy in the middle
internet[mem]=512

rA[0]=ispa
rA[1]=lana
rA[mem]=512

a[0]=lana

rB[0]=ispb
rB[1]=lanb
rB[mem]=512

b[0]=lanb

rW[0]=ispw
rW[1]=ispw
rW[2]=ispw
rW[3]=lanw
rW[mem]=512

w[0]=lanw

svr[0]=ispw
It’s that simple for the setup. Now for the more fiddly stuff of certificates, keys and trust.
StrongSwan
Certificates and keys will be needed on either side of the VPN for authentication. Creating your own heirarchy is possible here, with strongswan providing a simple guide how to do it. Command-line tools use the swanctl for current use, with ipsec as legacy.
Creating the root cert with ipsec pki:
$ ipsec pki --gen --size 4096 -f der > CA_Root_Key.derSelf-signing:
$ ipsec pki --self --ca --in CA_Root_Key.der \
--lifetime 1825 --dn="C=Some Country, O=Root Certificate Authority, CN=Self Signed Root CA Cert" \
-f der > CA_Root_Cert.der
From here, certificates signed by the root cert can then be made for each end of the VPN. Once they are in the right place, next thing is to establish connections between each entity. Again, we have differences in configurations depending on which package used. Latest strongSwan uses swanctl.conf, whereas legacy ipsec uses ipsec.conf and ipsec.secrets.
Each connection works via the conn keyword, with a nice array of options. Here is the Roadwarrior example of one conn that uses assignment of ‘virtual IP’ or one of several DNS servers:
conn rw-config
    also=rw-base
    rightsourceip=172.16.252.0/24
    # set this to a local DNS server that the clients can reach with their assigned IPs.
    # Think about routing.
    rightdns=
    leftsubnet=0.0.0.0/0
    leftid=whatevertheclientusestoconnect
    leftcert=mycertificate.pem
    # not possible with asymmetric authentication
    reauth=no
    rekey=no
    # secure cipher suits
    ike=aes192gcm16-aes128gcm16-prfsha256-ecp256-ecp521,aes192-sha256-modp3072,default
    esp=aes192gcm16-aes128gcm16-ecp256-modp3072,aes192-sha256-ecp256-modp3072
    leftsendcert=always
    rightca="C=This, O=Is, OU=My, CN=CA"
Finally with these configured, it is time to run service ipsec start on our VPN machines. Running ipsec statusall should yield some hopeful information.
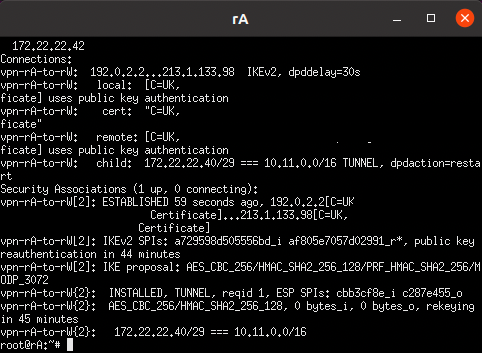
The guy is runing, with the certificate info displayed and the IKEv2 parameters. Capturing traffic in wireshark also can see the proposal from either direction and then the encrypted payloads for this protocol.
Wireguard
In comparison, Wireguard paints a very different picture to IPSec & StrongSwan. The wg command handles the generation of base64-encoded public and private keys, with the usual ip and ifconfig to sort out the interfaces. Say you wished to create the public-private key pair in one line:
$ wg genkey | tee privatekey | wg pubkey > publickeyConfigs can also be loaded with wg-quick with the name of your configuration as the name of the file in.
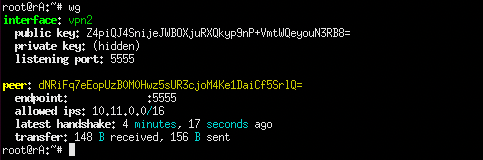
Even if wireguard is up, the handshake will only happen when one of the endpoints is wanting to send data. It also happens in a smaller amount of packets as well, this lightweight-ness shows up in multiple points compared to IPSec. Once data has been sent between peers, running wg then shows the information of all connections specified. Calling wg on it’s own then shows all of the interfaces present. In the case of the rA machine again:
Pros
Wireguard really has a strong selling point; simplicity, using the Noise Protocol Framework and is arguably lightweight in terms of lines of code as well. StrongSwan can be a behemoth, but it is good ol’ x509 and could be argued that there is more support for such. In the case of VPNs, there’s no need for public issued certificates like web servers. Provided the management of the keys is done well (which is easier said then done), a self-defined certificate authority could work.
Cons
Even with wireguard being simple to use, a small problem if it doesn’t work can take its toll in time. Then, with each conn a slight typo can just yield no connections. The IKEv2 proposal does also take a fair few packets to get up and going.
TL,DR; VPNs and virtual machine test rigs. Have a look at wireguard, it’s cool.